Welcome, fellow engineers! If you’re looking to dive into the world of Finite Element Analysis (FEA) and master one of the industry’s most powerful tools, you’ve come to the right place. Abaqus, developed by Dassault Systèmes, is a versatile software suite renowned for its robust capabilities in simulating complex engineering problems, from structural integrity to fluid-structure interaction and biomechanics.
This comprehensive Abaqus tutorial is designed to be your practical guide, transforming you from a novice into a confident Abaqus user. We’ll cut through the academic jargon and focus on actionable steps, practical workflows, and real-world tips that engineers like us truly need.
![]()
Image: The official Abaqus logo.
Getting Started with Abaqus: Your FEA Journey Begins
What is Abaqus and Why is it Essential?
Abaqus is a leading software for advanced FEA, offering a wide range of analysis capabilities, including linear and nonlinear static and dynamic analyses, heat transfer, mass diffusion, acoustics, and explicit dynamics. It’s a cornerstone tool in industries like aerospace, automotive, oil & gas, and medical devices, enabling engineers to:
- Predict structural behavior under various loads.
- Optimize designs for performance and safety.
- Simulate material response, including advanced constitutive models.
- Troubleshoot real-world engineering issues virtually.
Understanding Abaqus is crucial for anyone involved in CAD-CAE workflows, structural engineering, or performing FFS Level 3 assessments.
Setting Up Your Workspace
Before you launch Abaqus/CAE (the interactive environment), ensure your system meets the recommended specifications. A powerful CPU, ample RAM, and a capable graphics card are key for efficient pre-processing and post-processing, especially for large models. Ensure you have activated your Abaqus license correctly.
The Abaqus/CAE Interface: A Guided Tour
Abaqus/CAE provides a graphical user interface (GUI) to build, submit, and monitor your simulation jobs. It’s organized into modules, each dedicated to a specific part of the FEA workflow.
Module Breakdown: Your Toolkit for Simulation
Familiarizing yourself with the modules is the first step. Think of them as specialized workshops for different tasks:
| Module | Primary Function | Key Tasks |
|---|---|---|
| Part | Create/import geometric models | Sketching, extruding, revolving, importing CAD (.igs, .stp) |
| Property | Define material properties and sections | Material definition (elastic, plastic), section assignment, beam/shell profiles |
| Assembly | Assemble part instances | Positioning, creating dependent/independent instances |
| Step | Define analysis procedures and output requests | Static, dynamic, heat transfer steps; field/history output requests |
| Interaction | Define contact, constraints, and special interactions | Surface-to-surface contact, tie constraints, coupling |
| Load | Apply loads and boundary conditions | Concentrated force, pressure, displacement, temperature |
| Mesh | Discretize the model into finite elements | Seed parts, assign element types, generate mesh |
| Job | Submit, monitor, and manage analysis jobs | Create job, run, monitor, kill, restart |
| Visualization | Post-process and interpret results | Plot contours, animations, XY data, query results |
Practical Workflow: Simulating a Simple Beam Bending
Let’s walk through a typical workflow by setting up a static analysis of a cantilever beam under a point load. This illustrates the core steps applicable to most structural simulations.
Step 1: Part Creation (Geometry Definition)
- Module: Part.
- Create a 3D Deformable Solid Extrusion.
- Sketch a rectangle (e.g., 10×10 mm for the cross-section).
- Extrude it to a length (e.g., 100 mm).
Step 2: Property Definition (Materials & Sections)
- Module: Property.
- Create a Material: Name it ‘Steel’. Define Elastic properties (e.g., Young’s Modulus E=210 GPa, Poisson’s Ratio nu=0.3).
- Create a Solid Section: Name it ‘Beam_Section’, assign ‘Steel’ material.
- Assign the section to your part: Select the entire beam geometry.
Step 3: Assembly (Instance Management)
- Module: Assembly.
- Create an independent instance of your part. This allows you to mesh the instance directly in the Mesh module.
Step 4: Step Definition (Analysis Type & Time)
- Module: Step.
- Create a new ‘Static, General’ step.
- Set a descriptive name (e.g., ‘Apply_Load’).
- Consider nonlinear geometry if large deformations are expected (toggle Nlgeom ‘On’).
Step 5: Interaction (Contacts & Constraints)
For a simple cantilever, we might not need complex interactions. However, if multiple parts were involved, this is where you’d define surface contact, tie constraints, or couplings.
Step 6: Loads & Boundary Conditions (BCs)
- Module: Load.
- Boundary Condition 1 (Cantilever Fixity): Create a ‘Symmetry/Antisymmetry/Encastre’ BC. Select one end face of the beam and choose ‘Encastre’ (fixes all degrees of freedom).
- Load Application: Create a ‘Concentrated Force’. Select the opposite end corner or edge (use a reference point for precise application). Apply a force (e.g., -100 N in Y-direction).
Step 7: Meshing (Discretization)
- Module: Mesh.
- Seed the part: Assign a global seed size (e.g., 5 mm). Experiment with smaller sizes for critical areas.
- Assign element type: Select the beam. Choose a ‘3D Stress’ element (e.g., C3D8R – an 8-node linear brick, reduced integration).
- Generate Mesh: Click the mesh button. Review the mesh quality.
Step 8: Job Creation & Submission
- Module: Job.
- Create a new job. Name it (e.g., ‘Cantilever_Beam_Analysis’).
- Submit the job. Monitor its progress in the ‘Job Monitor’ window. Look for messages about convergence or errors.
Step 9: Post-processing (Results Visualization)
- Module: Visualization.
- Open the ‘Output Database’ (.odb) file generated by your job.
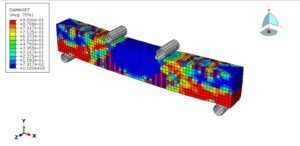
- Plot Contours: View stress (Mises, principal), displacement, or strain.
- Animate results: See how the beam deforms under load.
- Query results: Extract specific values at nodes or elements.
Verification & Sanity Checks: Trusting Your Results
FEA is powerful, but garbage in equals garbage out. Always perform checks:
-
Mesh Sensitivity Analysis
Run the analysis with progressively finer meshes. Your results (e.g., maximum displacement, stress) should converge to a stable value. If they don’t, your mesh might be too coarse or there might be singularities.
-
Boundary Condition Review
Double-check that your BCs accurately represent the real-world constraints. A common mistake is over-constraining or under-constraining the model.
-
Material Property Validation
Are your material properties correct for the temperature and loading conditions? Ensure units are consistent.
-
Convergence Criteria
For nonlinear problems, check the iteration history in the .dat or .msg file. If the analysis struggled to converge, it often indicates an issue with loads, BCs, or material definitions.
-
Hand Calculations & Benchmarking
Whenever possible, compare your FEA results with simplified hand calculations (e.g., beam theory for our cantilever example) or validated benchmark problems. This provides an essential sanity check.
Common Mistakes & Troubleshooting Tips
-
Meshing Issues
Problem: Failed mesh generation, highly distorted elements.
Tip: Simplify geometry, partition complex faces, adjust seeding, use swept meshing where possible, check element quality metrics. -
Convergence Problems (Nonlinear Analysis)
Problem: ‘Too many increments needed’ or ‘zero pivot’ errors.
Tip: Reduce increment size, use automatic stabilization, check contact definitions (initial overclosure), ensure material properties are well-defined (especially plastic regions). Look for rigid body motion. -
Contact Nonlinearities
Problem: Contact pairs not engaging, unexpected penetration.
Tip: Define initial adjustments, use appropriate friction models, consider surface-to-surface vs. node-to-surface contact, check master/slave assignment.
Beyond the Basics: Advanced Abaqus Techniques
Abaqus Scripting with Python
Abaqus offers a powerful Python API for automating repetitive tasks, creating custom pre-processing or post-processing scripts, and performing parametric studies. This is invaluable for complex workflows and integrating Abaqus into larger CAD-CAE pipelines or with tools like MATLAB.
Advanced Material Models
Explore Abaqus’s extensive library of material models: hyperelasticity for rubber-like materials, plasticity for metals, creep, damage, and more. Understanding these is key for realistic simulations in structural integrity and failure analysis.
Coupled Field Analyses
Abaqus can simulate coupled physics problems, such as thermal-structural, acoustic-structural, or fluid-structure interaction (FSI). These are critical for applications like biomechanics or advanced manufacturing processes.
Optimizing Your Abaqus Workflow
-
Leveraging CAD-CAE Integration
Streamline your process by importing CAD geometries directly into Abaqus/CAE. Familiarity with CAD software like CATIA is beneficial for preparing clean geometry for FEA.
-
Hardware Considerations
For large and complex simulations, consider high-performance computing (HPC) resources. Parallel processing capabilities in Abaqus can significantly reduce solution times.
-
Continuous Learning
The world of FEA is always evolving. Stay updated with new Abaqus releases, and explore specialized topics like explicit dynamics for impact analysis or submodeling for localized stress refinement.
Enhance Your Abaqus Skills with EngineeringDownloads.com
Mastering Abaqus takes practice. At EngineeringDownloads.com, we offer a range of resources to support your learning journey, including downloadable project files, Python scripting templates for Abaqus automation, and expert-led online tutoring or consultancy for your specific FEA challenges.
Further Reading
For official documentation and in-depth technical details on Abaqus features, refer to the Dassault Systèmes SIMULIA Abaqus Resources page.